HOW TO INSTALL A DIESEL AUXILIARY FUEL TANK
Many diesel truck owners know that installing an auxiliary diesel fuel tank is a great support system to allow them extended driving capability. And when you’re planning to drive your pick-up on extended trips, having the luxury of knowing you have that extra fuel in emergency situations can provide you with peace of mind knowing that you’ll always have enough fuel to get you where you need to go. But, if you’re looking to install auxiliary diesel fuel tanks for pickup trucks there are a few steps you’ll need to follow to ensure the installation is done properly and safely.
IMPORTANT
If you decide to lift the truck up to help perform the installation make sure you have a high enough rated jack to safely lift the vehicle. Also, do not under any circumstance get under the vehicle when it is only supported by the jack. All vehicles must be supported with appropriately size jack stands, placed on flat portions of the vehicles frame.
Step #1 – Clear your work area and truck bed
The first thing you always do when attempting to install an auxiliary diesel fuel tank is to make sure you have plenty of space in which to work. Most accidents and injuries occur when people are not prepared to work on a project or are cramped for space to move freely. You’ll also make sure to remove any items inside the bed of the truck like a bed mat for example.
Step #2 – Grab a buddy to help you for a while
Auxiliary diesel fuel tanks for pickup trucks usually aren’t very heavy items. However, having an extra set of hands will come in handy as you lift the tank to place it into the bed of your truck. Not only will this lighten the load but it may also prevent any scrapes or scratches to your trucks finish.
Step #3 – Set up the placement of the auxiliary diesel fuel tank
Before you start drilling holes in your pickup bed, you’ll first want to place the auxiliary diesel fuel tank in the location where it will be installed. You want to make sure to install the tank away from the sides, the front or back of the bed as well. The key here is that you want to have some space on all four sides of the auxiliary fuel tank to prevent the tank from rubbing against any portion of the truck bed, which could cause potential damage to the tank.
Step 4 – Mark the holes where you will install the tank on the truck bed
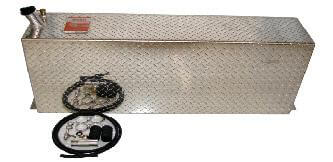
All of our tanks come with mounting tabs located either on the bottom edges, or in the case of taller tanks, which would be more prone to tipping over, on the bottom and on the taller back edges. With the tank properly located you then need to make sure to visibly mark the holes where you’ll attach the fuel tank to the bed of the pickup. Make sure you use a brightly colored marking tool such as a wax pen or chalk, so you don’t mistakenly drill the wrong hole.
Step #5 – Start drilling holes
After you’ve marked the mounting locations, remove the auxiliary diesel fuel tank from the pickup bed. At this point it would be advisable to center punch the locations of the holes to prevent the drill bit from straying away from the desired location for the hole. First drill the holes with a small bit to act as a “pilot hole” for the larger bit. Your final hole should be drilled with a bit that matches the bolts you have chosen to use. One word of caution however, before you drill make sure you check the undercarriage of the truck bed to make sure there are no other items under the hole locations that you might hit. It would be bad to drill holes into your existing fuel tank or another important item.
Step #6 – Install mounting hardware
Before you bolt your new tank into place, you should determine how and where you will run the 3/8” rubber fuel supply line from the tank to your existing factory fuel tank. Most tank owners simply drill another hole into the trucks bed and thread the line down to the factory tank filler neck. On some trucks, you can also gain access to the bottom side of the truck bed by removing the rubber plugs that are sometimes available near the bottom of the stake pocket support posts located in the corners of the truck bed. If these are available, you can remove the rubber plug, punch or cut a hole in the center of the rubber plug that will allow you to insert the rubber fuel line. Put the plug back in place and run the line down toward the factory fuel neck. Next you’ll place your auxiliary fuel tank in position and use the bolts, nuts and washer you have purchased to fasten the fuel tank in position. This is also when having a helping hand will come in handy as you can have help with holding the nuts or bolts in place as you tighten them from either the bottom or top of the auxiliary truck bed fuel tank.
Step #7 – Set up the Filter
If you decide to utilize an inline fuel filter, you will need to prime the fuel filter before you install it. To do this, remove the fuel filter and fill it up with diesel fuel. Then fill your fuel tank with diesel.
Step #8 – Installing the Adapter Kit
We have included a short video that explains the recommended process for proper installation of the included adapter kit, to connect your new auxiliary diesel fuel tank directly to your factory fuel tank. It is available directly below this article or by clicking here.
Step #9 - Using the unit
The final step is actually using the auxiliary fuel tank. Your tank will come with a shut off valve, which is screwed into the bottom drain hole on the tank. It is from this valve that you will run your rubber fuel line down to your adapter unit. This valve can be left on at all times or, some people like to only open it when they want to fill their tank. The auxiliary diesel fuel tank, when operated with gravity, will only replace the fuel in the factory tank that your engine consumes. As long as you installation has no leaks and you have a good functioning factory fuel cap in place, the auxiliary tank will not overfill your factory tank. Gravity does not exert enough pressure to compress the fuel so the only way it can leak or overfill is if there is some kind of leak in the system.
When filling the tanks on your truck, fill the factory tank first and replace the factory fuel cap. At this point, remove the auxiliary diesel fuel tank cap and fill it. With the valve opened, you are now ready for vastly improved cruising range.
There are many companies who provide great deals on auxiliary fuel tanks. When you’re looking for amazing pricing and great value on top-rated truck and car accessories look no further than the truck accessory experts here at 4truck-accessories.com. With hundreds of quality accessories priced to sell and a trustworthy customer service staff ready to answer any and all questions, we are confident you’ll find the best value on the internet on high-quality truck accessories at 4truck-accessories.com.
You must login to post comments.